

Building complex game UI in Phaser, menus, HUDs, dialogs, overlays, forms, inventory screens, often involves imperative scene code. PhaserJSX, built by Michael Rieck, offers an alternative approach. It brings a React-like component model to Phaser 4, letting you describe interfaces with JSX-style syntax, hooks and layout primitives instead of manually positioning and updating game objects.
The project is actively seeking feedback from Phaser developers building complex UI, particularly around API feel, missing components and real-world edge cases.
What PhaserJSX Brings to Phaser 4 UI Development
The core idea is to make Phaser UI code more declarative and component-based. Instead of building interfaces through imperative scene code, PhaserJSX lets you describe UI with JSX-style components, hooks, layout primitives and theming. The main features are:
- JSX-based UI components
- React-like hooks
- Flexbox layout engine
- Complete theme system
- Spring physics animations
- 30+ built-in components
- TypeScript first
- Multi-renderer — Phaser 4, PixiJS and Konva
- Portable components — write once, run anywhere
Here is what a simple counter component looks like in PhaserJSX:
/** @jsxImportSource @number10/jsx-core */ import { Button, Text, View } from '@number10/jsx-components' import { useState } from '@number10/jsx-core' function CounterExample() { const [counter, setCounter] = useState(0) return ( <View gap={20} alignItems="center"> <Button variant="primary" onClick={() => setCounter(counter + 1)}> <Text text="Click me" /> </Button> <Text text={`Count: ${counter}`} /> </View> ) }State changes update the UI automatically. No manual object manipulation, no manual cleanup.
Architecture: A Modular Package System
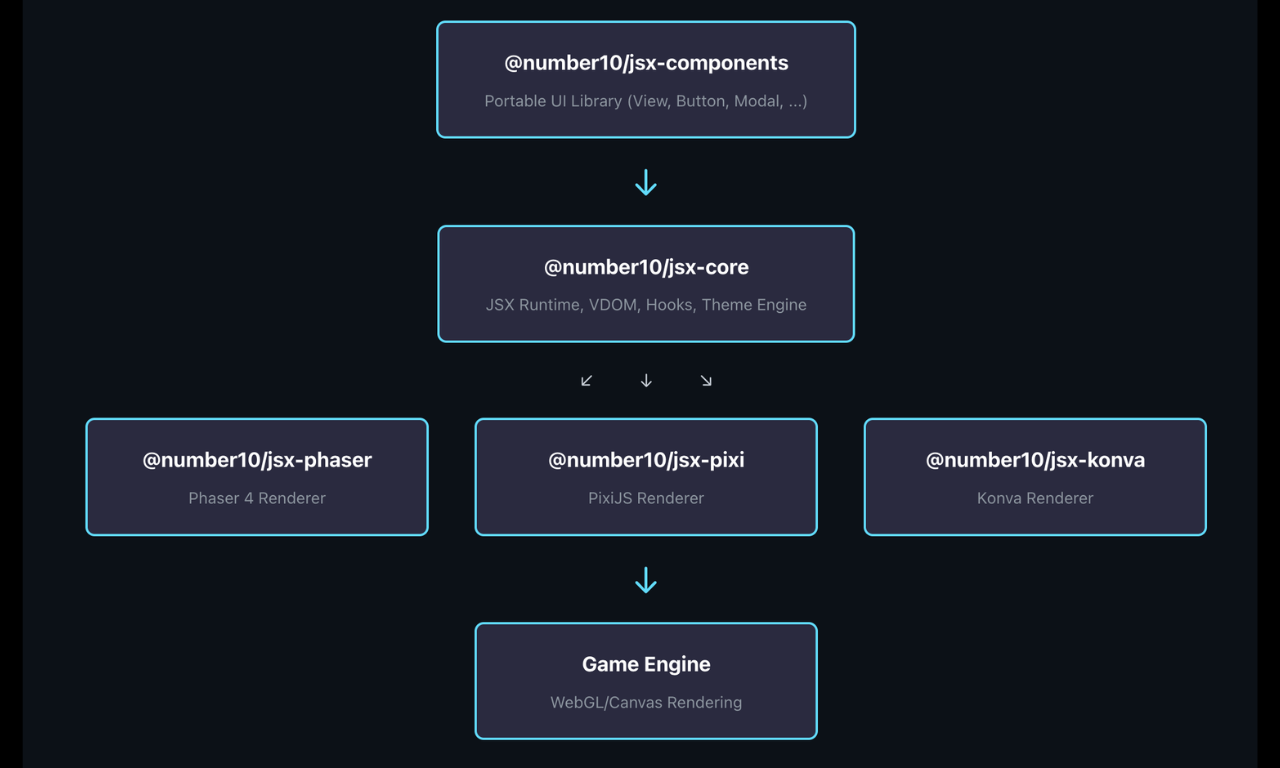
PhaserJSX is not a single package but a modular project built from composable pieces. Each renderer is a separate integration so you only bring in what you need:
- 📦 @number10/jsx-core — JSX runtime, VDOM, hooks and theme engine
- 🧩 @number10/jsx-components — 30+ portable UI components
- 🎮 @number10/jsx-phaser — Phaser 4 renderer integration
- 🖼️ @number10/jsx-pixi — PixiJS renderer integration
- 🎨 @number10/jsx-konva — Konva renderer integration
- 🧱 @number10/jsx-three — Three.js surface bridge for interactive UI panels on meshes
- 🏗️ @number10/jsx-icon-generator — CLI and Vite plugin for type-safe icon generation
When to Use PhaserJSX
PhaserJSX is a good fit for:
- ✅ Complex game UIs — menus, HUDs, inventory systems, dialog trees
- ✅ Interactive applications — educational tools, data visualisations
- ✅ Rapid prototyping — quickly iterate on UI designs and interactions
- ✅ Team development — component-based architecture scales well
- ✅ Cross-engine projects — share UI code between Phaser 4, PixiJS and Konva
Consider alternatives for:
- ⚠️ Simple static UIs — basic text displays may not need a VDOM
- ⚠️ Performance-critical rendering — heavy particle systems should use native engine APIs
- ⚠️ Minimal interactivity — if you don't need state management, native engine code is simpler
Getting Started with PhaserJSX in Phaser 4
The recommended setup for new Phaser 4 projects is the modular Phaser Direct path:
pnpm add @number10/jsx-core @number10/jsx-components @number10/jsx-phaser phaserPhaserJSX is also available for PixiJS and Konva, with an optional Three.js surface bridge for rendering interactive UI panels inside 3D scenes.
Interactive 3D UI Panels with the Three.js Bridge
One of the more unusual features is @number10/jsx-three, which lets the same portable UI model be rendered into an offscreen surface, mapped onto curved or flat meshes and used interactively inside a Three.js scene. Pointer events are forwarded back into the panel runtime, dialogs and portals still compose on the surface, and the UI remains a real layout-driven interface while living in world space.
PhaserJSX components are portable: write a component once and run it across Phaser 4, PixiJS, Konva or a Three.js surface without rewriting it for each renderer.
Explore PhaserJSX
Documentation, quick start, component explorer and installation guide in the link below. Source code on GitHub.