Phaser 4 updates the WebGL rendering system to become more powerful and reliable than ever before. This guide explains the core concepts, and how to use shaders in the new system.
- Rendering Concepts
- Sample Shader GameObject, Step By Step
- Sample Filter, Step By Step
1. Rendering Concepts
The Phaser 4 WebGL renderer "Beam" is a complete rewrite from Phaser 3. It concentrates on encapsulated drawing, where rendering operations will work anywhere in the system.
The following concepts are relevant:
- WebGL State Management
- DrawingContext Objects
- Batched Rendering
- Render Nodes
- Unified Draw Commands
WebGL State Management
Beam completely abstracts WebGL calls. You should never need to access the gl object.
If you somehow need to access the internal WebGL state, never call gl.someFunction(). Instead, use the Beam wrappers, including:
Phaser.Renderer.WebGL.Wrappers.WebGLGlobalWrapper, instantiated atgame.renderer.glWrapper. This object is a mirror of GL state, such as blend mode, current texture/shader/framebuffer bindings, scissor, texture premultiplication, etc.- Resource wrappers, such as
Phaser.Renderer.WebGL.Wrappers.WebGLTextureWrapper. These objects are created to contain WebGL resources such as aWebGLTexture, along with information about their creation. These should be created using methods such asgame.renderer.createTextureFromSourcerather than thenewconstructor.
These wrappers let us track the state between functions, and recreate it if the WebGL rendering context is lost.
DynamicTexture and Lost Context
The DynamicTexture (which is used by RenderTexture objects) draws to a texture in WebGL. These textures will be blank after the WebGL rendering context is recovered. All other textures and resources should be recreated completely.
If you alter the WebGL state outside these systems, the state may become unstable. Please use the built-in management systems if you need to make direct GL calls.
DrawingContext Objects
The DrawingContext is an internal renderer feature which helps encapsulate drawing operations. It's only relevant if you're working with the renderer internals.
The Phaser.Renderer.WebGL.DrawingContext object is a localised WebGL state which describes the current drawing settings. These include the camera, blend modes, framebuffer, and other settings which affect how and where pixels get drawn. It is like a drawing desk set up in a specific way.
DrawingContext is nestable: you can create a new DrawingContext, use it for drawing some objects, and then throw it away, returning to the previous DrawingContext. Use drawingContext.getClone() to create a copy, then modify it in place.
When handling a DrawingContext, you must call drawingContext.use() and drawingContext.release() at the start and end of its use. These run necessary code, such as clearing the context if it is scheduled for reuse, and starting new batch renders. Because a fresh DrawingContext has different drawing rules, it must notify existing batch renders that they should finish up before it goes into effect.
A DrawingContext can hold a framebuffer, in which case drawingContext.texture will refer to a texture. Everything drawn using the DrawingContext is drawn to this texture. For persistent resources like DynamicTexture, the texture is permanently retained. For temporary resources such as Filters, it is cleared after being drawn out.
Batched Rendering
Batching is handled automatically, but it is useful to understand it to ensure your games perform well.
The most basic way of drawing is a "Stand Alone Render" (SAR). This makes one draw call per object. Unfortunately, draw calls are quite expensive.
Phaser automatically batches common objects which can be combined into a single draw call. Most objects are "quads", which use the same shader and set of textures, so they batch together. This is far more efficient, and you should try to have large batches wherever possible for good performance.
Batches will "flush", rendering their contents and starting a new batch, when they meet one of several conditions:
- The batch is full (16384 quads).
- You run out of texture units.
- Most devices provide 8 or 16 texture units, so you can use that many textures in a single batch.
- Mobile devices may support many texture units, but perform best when using just 1. Set the game config option
autoMobileTexturesto tell Phaser to drop to 1 TU if it detects a mobile device.
- You use a different shader program.
- You use a different type of game object. Many game objects share shaders. Significant groups include:
- Basic quads: Image, Sprite, Text, BitmapText, etc.
- Repeating quads: TilemapLayer, Tilesprite, etc.
- Vector objects: Graphics, Shapes, etc.
- Stand Alone Render objects: TilemapGPULayer, Rope, etc.
- You use Filters, which not only use different shaders, but switch DrawingContext.
- You use the same game object, but in a way that requires changes to the shader program.
- You have one object which uses lights, and another which does not.
- You have enabled
roundPixels, such as via thesmoothPixelArtconfig option, and one object is at default scale and rotation while another is scaled or rotated.
- You use a different type of game object. Many game objects share shaders. Significant groups include:
There may be other things that trigger batch flushes, and it may behave differently on different devices. In general, try to keep similar game objects next to each other in the display list, use texture atlases instead of single textures, and your scene will behave better.
Render Nodes
A RenderNode is an object which handles some task in the render system. This is relevant only if you're working with render system interiors.
RenderNodes should be registered to the Phaser.Renderer.WebGL.RenderNodes.RenderNodeManager at game.renderer.renderNodes. Use addNode() to add an instantiated node. Use addNodeConstructor() to add a constructor which will be instantiated when requested. Use getNode() to request a node from the manager.
A node can have state, but be aware that the node will be reused, so if it might cause further rendering, consider using new objects to hold state.
A node doesn't have any fixed functionality. By convention, it does one job, which is invoked with node.run(). You should call this.onRunBegin() and this.onRunEnd() at the start and end of run; these methods let you debug nodes.
A node which provides batch functionality is invoked with node.batch() instead. You should call this.manager.setCurrentBatchNode(this, drawingContext) to signal that a batch is running. The render node manager will flush the batch by calling run(drawingContext) if another render node signals that it is changing the render state. You can also call run yourself from the batch method if you detect that the batch is complete. Here, the run method should immediately render the batch.
Nodes can call other nodes. This network forms the "render tree". You can see the render tree by running game.renderer.renderNodes.setDebug(true) to capture a frame, then game.renderer.renderNodes.debugToString() to get a formatted string describing which render nodes ran in your game.
The idea of Render Nodes is to allow a flexible approach to rendering tasks. For performance reasons, the default Beam nodes do a small number of large jobs. However, it's quite possible to break this down into a larger number of smaller, more customizable jobs.
Unified Draw Commands
Beam uses a unified set of commands to draw with WebGL. These are relevant only if you are working with renderer internals.
The game.renderer.drawElements() method is used for all current drawing operations in Beam. We also surface game.renderer.drawInstancedArrays() if this functionality is required. Both methods behave the same way.
WebGL state is only updated when a draw command is called. This prevents redundant or unnecessary calls from taking effect. You can update state manually in other circumstances, but this should rarely be necessary.
2. Sample Shader GameObject, Step By Step
The Shader GameObject uses your custom shaders to draw a quad. It's similar to a Sprite, except instead of a texture, it renders whatever you want to the area covered by the object.
To master using Shader, consider the following areas.
- Shader Rendering
- Authoring Shaders For Phaser
- Loading Shaders in your Game
- Creating Shader Objects
Shader Rendering
A Shader is a Stand Alone Render quad. This means that it interrupts any current batch, and does not batch itself. Each Shader uses a draw call, so be sparing with their use.
Authoring Shaders For Phaser
Shaders support custom vertex and fragment shaders. However, the default vertex shader works fine, so you should only think about the fragment shader.
Consider the following areas:
- Varyings
- Templates
Varyings
The default vertex shader provides one input to the fragment shader: varying vec2 outTexCoord. This provides coordinates from 0-1 in X and Y, telling the fragment shader which part of the quad it's in.
Note that Beam uses texture conventions where 0x0 is in the top-left of the texture. WebGL generally treats 0x0 as the bottom-left, so be aware of this convention. This shouldn't make a difference, as Beam also treats vertex coordinates as top-down.
Templates
If your shader does one thing, a single file works fine. But if you want to configure it at runtime, you should consider the Beam shader template system.
By using templating, you can split your GLSL code into multiple files, then combine them in various ways.
Shader templating uses GLSL preprocessor commands to define insertion points in the code. This templating system allows you to write valid GLSL code, so your editor/IDE can give as much assistance as possible.
Use #pragma phaserTemplate(key) to define an insertion point in your code. These points are replaced with any additions using that key, or with nothing if no additions use the key.
The template key #pragma phaserTemplate(shaderName) will define SHADER_NAME to the shader name used in the game. This can be useful for debugging, but is not necessary.
You can also define conditional code. Use #define KEY to define KEY, then use #ifdef KEY, #else, and #endif to check the state of a define. This is most useful when the define is added in a template.
A simple example:
#pragma phaserTemplate(enableBigNumber)

float getNumber ()
{
    #ifdef BIG_NUMBER
    return 10;
    #else
    return 2;
}
By default, this will return 2. If you use a shader addition which adds #define BIG_NUMBER to enableBigNumber, the shader will instead return 10.
Other uses for templates:
- Add optional code.
- Reuse code across many shaders, to reduce the size of your game package, or help you manage a large codebase.
Loading Shaders in your Game
Once you have written your shaders, you need to get them into your game. You can treat shader code in two ways:
- Load GLSL files
- Inline strings
These both have the same capabilities, and can be combined together. They're just accessed differently.
Load GLSL files
A GLSL file is a single shader or snippet of GLSL code.
Load a file like this:
class Example extends Phaser.Scene
{
    preload ()
    {
        this.load.glsl('Marble', 'assets/shaders/marble.frag');
    }
}
This will add the specified file to the game's shader cache under the key Marble. You can use the key in later steps. You can retrieve the file data using game.cache.shader.get('Marble'). It is stored as a Phaser.Display.BaseShader. The property baseShader.glsl contains the code from the file.
In Phaser 3, there were "shader bundles" which contained several shaders along with metadata. In Beam, this is no longer valid; bundles will not be parsed into separate shaders.
If you want to load large amounts of shader code, use JSON, XML, or other supported formats.
Phaser 3 also categorized shaders as either vertex or fragment, and combined them together as they loaded. Because Beam supports snippets that can be combined in many ways, this is no longer practical. A GLSL file is simply a single text file.
Inline Strings
You can define shaders or shader snippets as strings in your code. This is useful for keeping the number of files down, but may also prevent you from checking syntax in your GLSL code.
Creating Shader Objects
Once your shader is written and loaded, you can create it in your game. This uses the Phaser.GameObjects.Shader object.
The object has the following parameters:
// `this` is a Scene.
this.add.shader(config, x, y, width, height, textures)configis the main options object, and will be explained below.x,yare position.width,heightare dimensions of the shader quad.texturesis a list of textures or texture keys for the Shader to use, as explained below.
Config Object
The Shader config object has the following shape:
type ShaderQuadConfig =
{
    // Required:
    name: string;

    // Following are optional:
    shaderName: string;
    fragmentSource: string;
    vertexSource: string;
    fragmentKey: string;
    vertexKey: string;
    setupUniforms: (
        setUniform: (name: string, value: any) => void,
        drawingContext: Phaser.Renderer.WebGL.DrawingContext
    ) => void;
    shaderAdditions: Phaser.Types.Renderer.WebGL.ShaderAdditionConfig[];
    updateShaderConfig: (
        drawingContext: Phaser.Renderer.WebGL.DrawingContext,
        gameObject: Phaser.GameObjects.Shader,
        renderNode: Phaser.Renderer.WebGL.RenderNodes.ShaderQuad
    ) => void;
}
A typical config can be very simple:
// When using a loaded GLSL file:
const config1 = {
    name: 'myShader',
    fragmentKey: 'Marble'
};

// Or when using inline GLSL code:
const glsl = '// GLSL code goes here';
const config2 = {
    name: 'myOtherShader',
    fragmentSource: glsl
};
A more complete explanation follows:
name: Required. The overall name of your Shader. Your Shader creates a Phaser.Renderer.WebGL.RenderNodes.ShaderQuad with this name. Because the node is only stored in the Shader, this name doesn't need to be unique. It helps with debug.
shaderName: The name used as the base of the shader program name. If not given, defaults to the name property. If your shader code contains #pragma phaserTemplate(shaderName), the name will be inserted there, including this base, any enabled shader additions, and whether it is a vertex or fragment shader. This helps with debug.
fragmentSource and vertexSource: The source code of the fragment and vertex shaders, as inline strings. Both of these have default options. The default vertexSource enables default behavior and should not need to be set. The default fragmentSource displays a color gradient to show that the shader is working.
fragmentKey and vertexKey: The key of the fragment and vertex shaders in the game cache. The fragmentSource and vertexSource properties will override these options, if present.
setupUniforms: A function for setting shader program uniforms. It is assigned to the Shader's render node, and runs every time the Shader is rendered. It is invoked with setUniform() and drawingContext. The setUniform(name, value) method is passed in by the render node, and can be called to set uniforms in your shader. This is useful for animating values, and is also necessary for using textures. The drawingContext contains information about the current GL state.
// How to update the `time` uniform on a Shader:
const config = {
    setupUniforms: (setUniform, drawingContext) =>
    {
        setUniform('time', this.game.loop.getDuration());
    }
}shaderAdditions: A list of shader additions. Different additions may add to the same template location, so order is important. Each addition is an object describing what to add to the shader code. It is of the shape:
type Phaser.Types.Renderer.WebGL.ShaderAdditionConfig =
{
    // The name of this addition. This contributes to the full shader program key.
    name: string;

    // A list of additions to make. The `key` is located in the shader by `#pragma phaserTemplate(key)`. The value is added to that location in the shader, as well as values from other additions.
    additions: { key: string, value: string }[];

    // Optional tags used to identify the addition if the name changes.
    tags: string[] | undefined;

    // Whether to disable the addition. A disabled addition is not compiled into the shader program.
    disable: boolean | undefined;
};
An example addition, designed to add texture mapping to the default fragment shader (ShaderQuad.frag in the Phaser source code):
const addition = {
    name: 'myAddition',
    additions: [
        { key: 'fragmentHeader', value: 'uniform sampler2D iChannel0;' },
        { key: 'fragmentProcess', value: 'fragColor = texture2D(iChannel0, outTexCoord);' }
    ]
};updateShaderConfig: A function which reconfigures the shader program. This is an advanced feature used to manage shader additions. This can be useful if you change a game setting and need to recompile your shader. It is assigned to the Shader's render node. The function is called during rendering, before setupUniforms. The function is probably an arrow function, so even though it belongs to the render node its this doesn't match, so we pass in the render node as a parameter for convenience.
// How to toggle a shader addition on a Shader:
const config = {
    updateShaderConfig: (gameObject, drawingContext, renderNode) =>
    {
        // Manages the shader program and cached variants.
        const programManager = renderNode.programManager;

        // How to get an existing addition:
        const myAddition = programManager.getAddition('myAddition');

        // Toggle addition:
        myAddition.disable = !myAddition.disable;

        // The shader will recompile additions once this function returns.
    }
};
Changing Additions at Runtime
As well as enabling or disabling additions, you can edit their code directly.
However, Beam caches shaders by name, to avoid expensive shader compilation. It will only compile your changes if you change the name of the addition. For example, the core Beam shader which handles sprite rendering has an addition which changes its name based on how many textures each batch should contain; it might be
1TexCountor8TexCount.
Textures in Shaders
If you have textures in your shader, you must supply them during construction, and set them as uniforms. Here is a game which demonstrates a minimal textured shader.
class Example extends Phaser.Scene
{
    preload ()
    {
        this.load.image('checker', 'assets/pics/checker.png');
    }

    create ()
    {
        const frag = `
        precision mediump float;
        uniform sampler2D iChannel0;
        varying vec2 outTexCoord;

        void main ()
        {
            vec4 pixel = texture2D(iChannel0, outTexCoord);
            gl_FragColor = vec4(outTexCoord.xyx * pixel.rgb, 1.0);
        }
        `;

        const shader = this.add.shader({
            name: 'simpleTexture',
            fragmentSource: frag,
            setupUniforms: (setUniform, drawingContext) => {
                setUniform('iChannel0', 0);
            }
        }, 400, 300, 800, 600, [ 'checker' ]);
    }
}

const game = new Phaser.Game({
    type: Phaser.WEBGL,
    width: 800,
    height: 600,
    scene: Example
});
Note that the Shader object is constructed with a setupUniforms method which sets the texture uniform, and a list of textures [ 'checker' ]. Because the texture is at index 0 in this list, it will be assigned to texture unit 0, so we set the uniform for the texture to 0. Other textures would be in unit 1, then 2, 3 etc. If you do not set the uniform for a texture, it will be 0; this may still work if you are using a single texture, but it is not usually what you want.
When using textures, you may find it useful to adjust the texture coordinates using shader.setTextureCoordinates() or shader.setTextureCoordinatesFromFrame() if you are using a frame from a texture atlas.
3. Sample Filter, Step By Step
Filters are an alternative way to use shader programs. Where a Shader just has an output, a Filter has an input and an output, and is designed to operate as part of a stack of other filters, progressively altering imagery as it passes through the stack.
Filters are available on cameras and all game objects. Consider the following areas:
- Using Filters
- Authoring Filters
Using Filters
Filters are available on cameras by default at camera.filters. To use filters on game objects, run gameObject.enableFilters(), then access gameObject.filters.
Filters are divided into two lists: filters.internal and filters.external. Internal filters try to follow the camera or object. External filters run after the internal filters, and sit "outside" the camera or object.
Create a Filter in a list with an add method, e.g. const filterController = gameObject.filters.internal.addBlur(). Filters usually have several configuration parameters, which can be modified from the controller object later on.
Each filter can set padding using filterController.setPaddingOverride(). Pass four numbers to set the left, top, right, and bottom padding values. Pass just null to set automatic padding for those Filters that support it.
Here's a simple diagram of padding and the internal/external context.
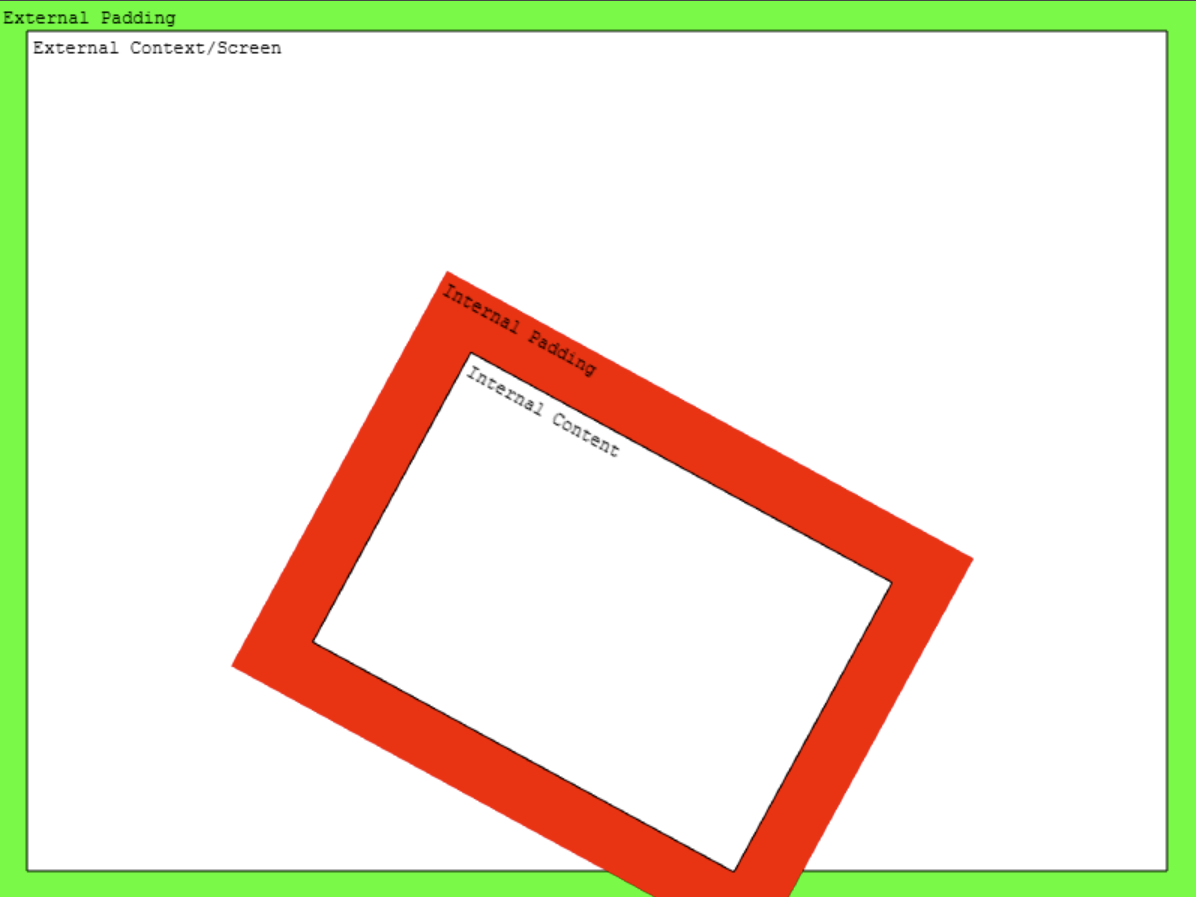
The external context is usually the screen, but if you are rendering objects inside other objects, the external context might be the internal context of another filter.
If you put internal filters on something without width and height values, the internal context is the same as the external filters.
On a technical level, each filter draws to a fresh framebuffer, which is passed as a texture input to the next filter. This is handled by a pool of DrawingContext objects maintained by the Beam renderer.
Authoring Filters
Filters are slightly more complex than Shaders, but they use the same core shader program systems. Most of the same concepts apply to authoring.
To create a Filter with a custom shader program, you need two parts: a Controller and a RenderNode. Here's an example:
class BumpToNormal extends Phaser.Filters.Controller
{
    constructor (camera)
    {
        // The name 'FilterBumpToNormal' is defined in FilterBumpToNormal.
        super(camera, 'FilterBumpToNormal');

        // Properties on the controller are used to pass data to the shader.
        this.radius = 1;
    }
}

const fragmentShaderBumpToNormal = `// GLSL code goes here`;

class FilterBumpToNormal extends Phaser.Renderer.WebGL.RenderNodes.BaseFilterShader
{
    constructor (manager)
    {
        // The name 'FilterBumpToNormal' is used by the Controller.
        super('FilterBumpToNormal', manager, null, fragmentShaderBumpToNormal);
    }

    // This function is called by the renderer.
    setupTextures (controller, textures, drawingContext)
    {
      // Custom code goes here.
      // `textures` is an array of WebGLTextureWrapper objects.
      // These will be assigned to texture units in list order.
      // `textures[0]` is always the input from the previous step in the filter stack.
      // Assign your textures to `textures[1]` and up.
    }

    // This function is called by the renderer after `setupTextures`.
    updateShaderConfig (controller, drawingContext)
    {
        // Custom code goes here.
        // This works just like a Shader: update your shader additions here.
        const programManager = this.programManager;
    }

    // This method sets up the uniforms for the shader.
    // It is called by the renderer after `updateShaderConfig`.
    setupUniforms (controller, drawingContext)
    {
        // Custom code goes here.
        // This works much like a Shader, except because you're defining a whole class,
        // you have access to `this.programManager` directly.
        const programManager = this.programManager;

        programManager.setUniform('resolution', [ drawingContext.width, drawingContext.height ]);
        programManager.setUniform('radius', controller.radius);
    }
}
Note that a Filter only takes a fragment shader; there is no option for a vertex shader. This is because the vertexes are calculated by Beam as it composites the filter stack.
Note also that the BaseFilterShader extension uses inline GLSL code for this example. It also supports loaded GLSL files, just like Shader; use super('FilterBumpToNormal', manager, key) where key replaces null to use a cache key.
To use your filter, you must first register the render node, and then add it to a game object.
class Example extends Phaser.Scene
{
    preload ()
    {
        this.load.image('distortion8', 'assets/textures/distortion8.png');
    }

    create ()
    {
        if (!this.renderer.renderNodes.hasNode('FilterBumpToNormal'))
        {
            // Load the custom filter.
            // We load during scene creation because the renderer has booted by this point.
            this.renderer.renderNodes.addNodeConstructor('FilterBumpToNormal', FilterBumpToNormal);
        }

        // Add an image for filtering.
        const image = this.add.image(640, 360, 'distortion8')
        .enableFilters();

        // Add custom filter to the image.
        // Note that the filter requires a camera to be passed to it.
        const bumpToNormal = image.filters.internal.add(
            new BumpToNormal(image.filterCamera)
        );
        bumpToNormal.radius = 8;
    }
}
This is a simple example. You can use all the more advanced features of Shaders with Filters, including shader additions which you can manage in updateShaderConfig. To create a Filter with shader additions, just add them to the BaseFilterShader call:
super(name, manager, fragmentShaderKey, fragmentShaderSource, shaderAdditions);There are many more intricate possibilities in Beam, but the areas covered by this guide should be enough for most uses, and it shows you all the key areas. To learn more, try digging into the Phaser source code at https://github.com/phaserjs/phaser and see how we've used the principles explained here. We have not explained the systems used to set up GPU resources, including index buffers, VAOs, and attribute binding, as they are relevant only when designing vertex shaders with their own attribute schemes. Shaders and Filters use quads managed by the Phaser Beam renderer, which keeps everything simple.