Now you've enabled multi-texture support, it's worth learning how to check if it is working or not. There are various ways to do it, but one of the best at the moment is actually to use Mozilla Firefox, as it has a fantastic Canvas debugger built-in.
Assuming you've downloaded and installed it, open-up your game (or any Phaser test) into Firefox and hit F12 to open the Dev Tools. Across the top you should see the various tools available: Inspector, Console, Debugger, etc:

If "Canvas" isn't on this list, then click the Settings icon:
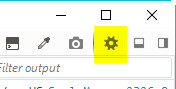
And then check "Canvas" in the list of "Default Firefox Developer Tools". It should appear instantly on the tool list.
Create a snapshot
Click the "Canvas" tool. It will likely ask you to Reload the page, to be able to debug the canvas contexts, so do that. You then need to create a snapshot of the game. Do this by clicking the tiny snapshot icon:

Firefox will then start to capture the draw calls for a single frame. After a while it'll give you a report, showing progressive screen grabs as the frame was built, and all of the WebGL calls that created it. Here is the game Aquaplane, part of the Interphase 1 book, running in WebGL:

The most important, and arguably most expensive, calls are highlighted in green. In the screen shot above you can see drawElements highlighted lots of times.
When we made the snapshot above there were 21 draws, and 80 calls being made. Mostly thanks to the little particle sprites from the waves. It's not a huge number, by any means, but we can still improve it. Let's modify the game source to include multi-texture support, and observe the results.
First, here is the preload block, so you can see the textures being used:
preload: function () {

    this.load.path = 'assets/';

    this.load.bitmapFont('fat-and-tiny');
    this.load.bitmapFont('interfont');

    this.load.images([ 'logo', 'boat', 'skier', 'pole', 'rock', 'shark', 'sea' ]);
    this.load.spritesheet('waves', 'waves.png', 16, 6);

}
First of all, let's enable the images for multi-texturing:
var enabled = this.game.renderer.setTexturePriority(['boat', 'skier', 'pole', 'rock', 'shark', 'sea', 'waves']);If we run the game now, we get this:

Voila! Just 6 draws, and 66 calls. You can clearly see far less calls to drawElements being made, but we can do better.
Watch how the frame is built in the following animated gif, the black frame is the first frame:

Notice how the background appears, then all of the sprites, then the rope is drawn, then the text last.
In our source code, the line from the water-skier to the boat is drawn with a Graphics object. In WebGL these cause batch flushes. The code in our create statement looks similar to this:
//  The rope that attaches the water skier to the boat
this.rope = this.add.graphics(0, 0);

this.scoreText = this.add.bitmapText(16, 0, 'fat-and-tiny', 'SCORE: 0', 32);
this.livesText = this.add.bitmapText(680, 0, 'fat-and-tiny', 'LIVES: ' + this.lives, 32);
A rope, and two fonts. Simple enough. But we can get the font drawn in with all of the other sprites just by changing the display order slightly. Let's move the rope after the text in the display list:
this.scoreText = this.add.bitmapText(16, 0, 'fat-and-tiny', 'SCORE: 0', 32);
this.livesText = this.add.bitmapText(680, 0, 'fat-and-tiny', 'LIVES: ' + this.lives, 32);

//  The rope that attaches the water skier to the boat
this.rope = this.add.graphics(0, 0);
Now the frame builds like this:

Which is better, the Graphics flush is reserved for the end. But how we can get the font to draw at the same time as all the sprites? We use the textureIndex property:
var enabled = this.game.renderer.setTexturePriority(['boat', 'skier', 'pole', 'rock', 'shark', 'sea', 'waves']);

if (enabled.length < this.game.renderer.maxTextures)
{
    //  Enable for the BitmapFont
    this.game.cache.getBitmapFont('fat-and-tiny').base.textureIndex = enabled.length + 1;
}
The first line enables texture support for the images. This returns an array. We check we've still got a spare texture slot, and then set the textureIndex property on the Bitmap Font BaseTexture.
Looking at the frame draw sequence again:

You can now clearly see everything is drawn at once, right at the start, followed by the rope. If we look at our snapshot now:

Down to 4 draws, and 50 calls. Much better! But we can go further.
The cost of Phaser.Debug
If you look at the end of the draw call list in the screen shot above you'll notice this part:

What is this one final draw call, right before the end of the frame?
It's actually the Phaser.Debug class. Even though we're not using debug at all in this game, just like you shouldn't in any production level game, it still draws an empty texture to WebGL. If you look at the frame thumbnails at the bottom, you can see it's responsible for that duplicate end frame.
Let's disable Debug via our game config object by setting enableDebug to false:
var cfg = {
    width: 800,
    height: 600,
    multiTexture: true,
    parent: 'game',
    enableDebug: false
};

var game = new Phaser.Game(cfg);
And re-run our test:

Just 3 draws and 38 calls in total now. Nice!
clearBeforeRender
Is there anything more we can do? Yes, we can disable one final property:
this.game.clearBeforeRender = false;By default Phaser will clear the Canvas each frame, before rendering all the sprites again. However our game doesn't need this. Why? Because it has a full-screen size background image (the sea and horizon). In effect, this one single image is performing a 'clear screen' for us, by completely overwriting any pixels that were there left over from the previous frame.
We can disable that using the clearBeforeRender property, and re-check our game:

Bingo! Just 2 draws and 36 calls in total. Pretty good, right?
The clearBeforeRender trick works in Canvas and WebGL. There are cases when you can't use it: If you don't have your game background filled with a texture for example, or if your background texture has opacity in it somewhere (maybe showing the web page background behind it). In those cases, you still need to clear.
In the vast majority of games though, you can almost certainly use this technique this and benefit from it.
The smaller, the better!
From 21 draws down to 2, and 80 calls down to 36. All we did was add a couple lines of code, disable debugging and clearing, and re-order one item in our display list. And as a result our CPU and GPU is now doing substantially less work. If our game didn't have a Graphics object in, it would fit in one single draw call.
Using the slider at the top of the Canvas tool, or clicking the thumbnails at the bottom, you can literally walk through the creation of the frame. This is really useful, as it shows you the drawing order of your display objects. Every time you see another drawElements, you know the batch has flushed, and it has cost time (both GPU and CPU). So try your best to reduce these down as far as you can go. Your players devices will thank you for it :)
If you've not yet enabled multi-texture batching, then now is the time to do so. Use Firefox to profile your game. Take snapshots, and compare them. You can save the snapshots, play back through them, and filter out the draw calls to see just the important ones.
In short, the less calls your game makes: the better! So keep tweaking it.